Posts

Completion!

Image
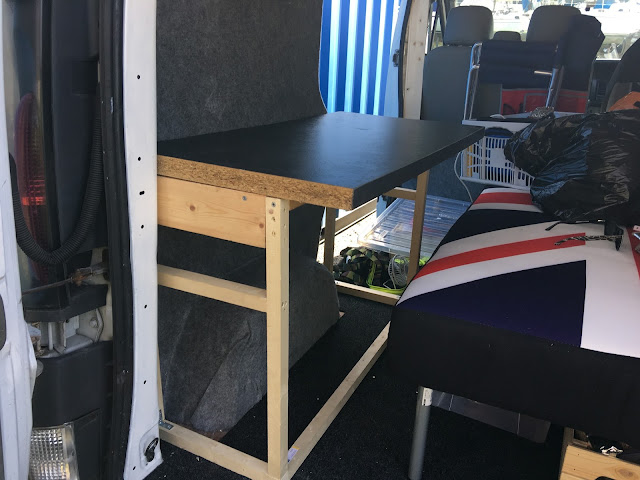
So the van is at last mostly complete! We have had our first few nights out, and she is very comfortable. We will deffinetly be buying a drive away awning though to enlarge our space and to ensure we don't get too stuffy inside in the summer.. We have some rough edges to tidy up such as the side of the table obviously, and some other holes in the chassis, the rear doors are still uncovered (might just be painted), and it needs a little more storage. We've got a load more of those little net compartments that are great for holding phones and nick backs, phone charger cables, battery isolator keys, etc etc. The table was made from a piece of kitchen work surface I found onsite where I work, and then a small wooden frame made with quite cheap wood from B&Q, as I didn't want anything too heavy. It has been screwed in so it doesn't move, but is easily removed to use the van as a van. Sadly I still haven't put enough into the van to be able to ta...

EGR Valve and other mechanical issues.

Image
Apparently a common problem with Renault Traffics, Nissan Primastars and Vauxhall Vicars is the EGR Valves. (These vans are all the same minus the badge). I found this out the hard way when the van turned itself off in a McDonalds drive thru. It was just like the key had been turned off. Embarrassingly, I had no choice but to knock on the window that I had just ordered from, as the lady had disappeared. Eventually three guys came and pushed me out, and then one guy came and handed me my order whilst I tried a few things I thought may be the problem and called the AA. Turns out the EGR was blocked and sticky. The AA man smacked the valve with the bottom of a can of Easy Start spray, sprayed some in whilst I turned the key, and she burst into life! After that I removed it and cleaned it, quite well I thought, but sadly to no avail. It stopped a few more times, and I saved myself by smacking it with a readily available hammer in the back. After some research it was decided it n...

MOT

Got it through the MOT! Wasn't expecting that, maybe I should have more faith in my own mechanical skills. Got the new washer jets literally five minutes before I was going to have to cancel the MOT because of dodgy washer jets! Fitted them pronto and got it through, with just an anti roll bar linkage on the advisory, and a slight gearbox leak to investigate. We will hopefully get out now for a night, despite needing to link the batteries still, and buy a curtain, camping stove, and to decide whether we will have a little sink, fresh and waste water tanks etc. I have finally finished the carpet (mostly) too, and also had a problem with the EGR valve! But thats another post. As it starts to tidy up I will post more pictures, the LED lights I installed look awesome at night.

Table/Worktop and sofa bed - Starting to look finished!

Image
So we have now bought and placed inside a sofa bed, it cost £120 from eBay, and it looks awesome with the union jack on it! I had to reinforce the bottom as it was fairly cheap, and replace the factory legs as they weren't tall enough to get over the wheel arches. The legs cost £3.28 each from B&Q, and I bought six, so three each side. Along with the reinforcing wood, they were the perfect height for the arches without arch covers on. Yes, its a bit caveman, when we want the bed we have to drag the sofa out a little bit, and fold it down. But it fits perfectly, no space is wasted over the arch, and when used as a sofa, there is storage space behind for a couple of camping chairs, that will go under the bed once made. I will be bungeeing the bed too, so it will stay in place and is more secure, but will be stretchy enough so we can fold it into the bed and back into a sofa again. I then set about making a table worktop, with the intention of maybe eventually cutting a hole...

Tongue and Groove Roofing, LED Lights and Carpet

Image
Moving right along.... So after placing and taping a lot of insulation to the roof (duct tape to Dialls Loft Insulation in place, and then foil tape to cover that over with foil insulation, and seal the edges), we went back to B&Q, and bought some slim tongue and groove wood. We bought x5 packs of 2 metre stuff, and I still have 1.2 packs to spare! Due to the planks I installed on the roof previously, this didn't take very long at all and was very easy. Therefore I can move swiftly onto the LED Lights. These came from Amazon, cost about £15 for all 3. Again, having previously installed all the wiring through conduit, these just needed crimping together and screwing to the tongue and groove wood. Simple. And now to carpet, again very easy! Bought 5m squared of the stuff plus x4 bottles of adhesive as a kit from eBay for £45. Might have been easier with two people, but I seem to have managed just fine :) Below is also the time lapse of everything mentioned in this post:...

Bulkhead, Roof Insulation and LED cables.

Image
Next up! Is the bulkhead and the roof needed insulating. To start, I gave up on making a full size bulkhead. This is because of the seats. Where they have a backwards incline, and I wanted my bulkhead to be about an inch thick and filled with insulation to keep the heat in, this meant that the amount of space in the back of the van was getting considerably smaller, and the bulkhead was starting to poke out into the side door. Instead, I've made myself a 2 foot high mini bulkhead. For two reason: One, being that it would provide some storage at the bottom of the seats, and two, being I then have a panel to mount a USB, Switch and Volt Metre, and a car stereo. I'll be adding the car stereo in the future, but at least I have somewhere to put it! As you can see in the picture below, I have already installed some pallet wood onto to the roof, so I have something that isn't metal to screw the tongue and groove roofing into. Luckily with the Renault Trafic, there are raised...

Insulation

Image
So after paying an inordinate amount of money to keep the van going, it was time to buy insulation, strip the back out, clean and re assemble. We started off by sanding the scratched metal parts inside the rear doors with white hammerite, as it looked awful, and I realised they would remain on show once completed. The next bit was to remove the already installed ply lining. As well as the recent new clutch and engine, the pre installed ply lining was a huge factor in deciding it was the van for us, as that was a relatively big job that I didn't then have to do! All we had to do was remove, insulate and replace over the top, easy! Easier said than done, as it turns out... It had been sealed on the edges to stop rattling while driving. Awesome idea, but made removing them a nightmare. After considerable amounts of cutting with a stanley knife and scraping with a flat head screw driver, it was all off, as can be seen in the time lapse below: Once all was removed, all I had...